 Â
 
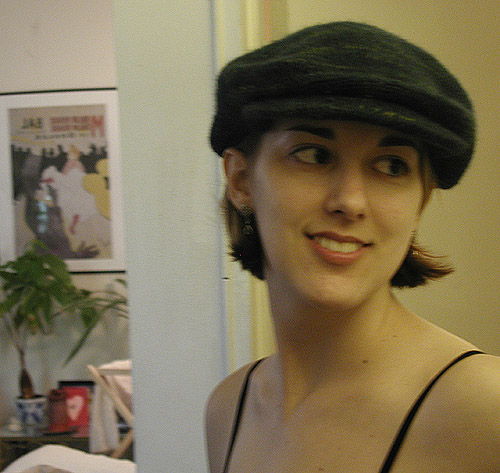
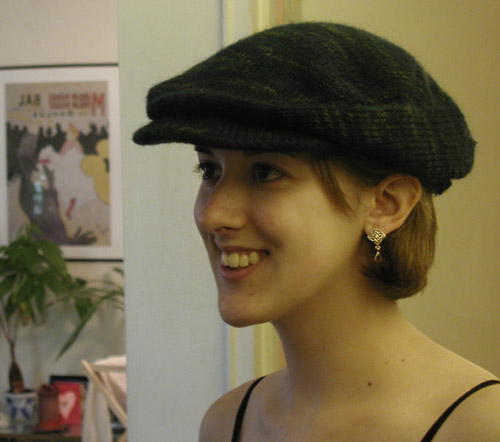
This is the first pattern I’ve designed. I wanted to knit something that my dad and brother might actually wear without making the time commitment a sweater for tall men requires. They love wearing jeff caps (also called ivy cap, english driving cap) so I decided to try to make one. It’s named for them.
SIZE
One
FINISHED MEASUREMENTS
Circumference: 23 inches
MATERIALS
Mountain Colors Bearfoot [60% superwash wool, 25% mohair, 15% nylon; 350yd / 320m per 100g skein]; color: Evergreen; 1 skein
1 set US #6 / 4.0mm straight needles
1 set US #7 / 4.5mm circular needles
Tapestry needle
26 inches 1-inch wide elastic
Thread
1 sew-on snap
Plastic piece for brim, or similar (I used 3 layers of Pellon Peltex 70 Ultra Firm Stabilizer)
GAUGE
21 sts / 29 rows = 4″ in stockinette stitch
PATTERN NOTES
You will be working with 2 strands at once. Also, the circumference of the hat was several inches bigger than the 23″ I wanted it to be (which was the size of another jeff cap my dad has). I fixed this by using elastic for the band, and gathering the extra in while I sewed it on. If you want to make a smaller hat, I would recommend maybe making the pieces shorter so you won’t end up with all that extra space. If you want to make a bigger hat, just use a longer piece of elastic for the band.
PATTERN
Top/Back Piece:
Using the straight needles, CO 30 sts.
Work in St st, inc 1 st on each end of knit rows 10 times. – Should have 50 sts, be 3 inches long.
Continue St st for 4.5 inches until piece measures 7.5 inches total.
Continue St st, dec 1 st on each end of knit rows 12 times. – Should have 26 sts, be 11 inches long.
Continue St st for 3.5 inches until piece measures 14.5 inches total.
BO all sts.
Front/Sides Piece:
Using the straight needles, CO 15 sts.
Work in St st. Inc 2 on rows 5, 7, 9.
Continue St st until piece measures 23 inches.
While working in St st, dec 2 on knit side 4 times.
Work 4 more rows in St st.
BO all sts.
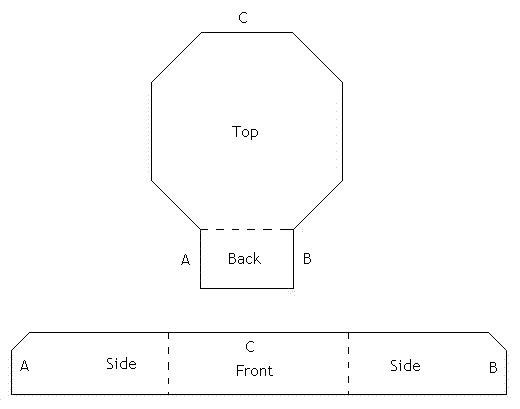
Weave in ends. Sew top/back and front/sides together, matching pieces according to diagram (below). Note: The front/sides piece will appear to not match up to the top sides piece. To make them fit, sew every 1 stitch on the front/sides piece to every 2-3 stitches on the top/back piece (but only for a little bit on the sides). This gives it kind of a rounded/gathered look that I liked.

Brim:
In center front of hat, pu 14 sts with the circular needle.
P 1 row.
Next row: K2, m1, pm, k10, pm, m1, k2. Pu 2 sts from hat edge.
Next row: P to end, pick up 2 sts from hat edge.
Next row: K to marker, m1, sm, k10, sm, m1, k to end, pu 2 sts from hat edge.
Next row: P to end, pu 2 sts from hat edge.
Repeat last two rows, except pu 3 sts on both sides, then 3, then 4, then 2. End with RS facing.
P 1 row.
Next row: BO2, slipping first st before binding off rather than purling it, p to end.
Next row: BO2, slipping first st before binding off rather than knitting it, k to 2 sts before marker, ssk, sm, k10, sm, k2tog, k to end.
Repeat last two rows, except BO 4 sts on both sides, then 3, then 3, then 2, then 2.
BO all sts.
FINISHING
Block if desired. Cut plastic to size of brim. Insert in brim and sew closed. Sew one side of snap to middle of top of brim, and sew the other side of snap to middle of front of hat. Sew elastic to inside edge of hat so that it has a 23″ circumference. Place hat on head.
That’s a great hat pattern! Thanks for sharing it.
Comment by dancingbarefoot — April 23, 2006 @ 6:23 pm
I just saw this on Craftster and had to come by… What an incredible first self-design! I love it!
Thanks for providing a pattern…
Comment by Lori — April 23, 2006 @ 9:03 pm
Saw your post on Craftster. I love this hat!!
Comment by PallasAnila — April 24, 2006 @ 1:24 pm
I absolutly love your cap!! I’m making the skirt from the Men’s Issue (Fall/Winter 2005) of Knit.1, and then knit the tank top from their Summer issue of this year in blue to match, and this hat would be PERFECT for my outfit!!! Thank you for posting the pattern!
Knitting Faerie
Comment by KnittngFaerie — May 23, 2006 @ 4:07 pm
I saw this on craftster, and it is so cute! I know a bunch of guys who it’d be perfect for, but I want one for myself!
Comment by Nicole — November 5, 2006 @ 10:43 am
Cute!! Thank you so much for sharing your pattern 🙂
Comment by Jenny — March 3, 2008 @ 7:07 pm
Awesome pattern! Thnx.
Comment by Beckyzzz — June 1, 2008 @ 2:52 pm
I love this cap and thanks so much for sharing the pattern! I do have a question though…do you have finished measurements for the pieces? I started making it yesterday and it just looks enormous! Thanks again!
Comment by Samantha — June 3, 2008 @ 8:32 am
[…] recent issue of Knitty (which I discussed last week), a Garnstudio crocheted cap pattern, and the Mikey Cap by kris knits. Each has a slightly different shape and stitch pattern, so there may be something out there for […]
Pingback by Knit or crochet the perfect newsboy cap | Do it Yourself — June 16, 2008 @ 7:40 pm
[…] kris knits » Mikey Cap […]
Pingback by kris knits » Mikey Cap « — August 17, 2008 @ 11:35 pm
The finished hat circumference is 23″. See my Pattern Notes in the above pattern though, the hat does come out rather large. I haven’t had time to knit another one to rework the pattern but that is in my plans for the future.
Comment by Kristin — October 14, 2008 @ 9:38 am
Hi Kristin….I love your hat….I came across it as I’m in the middle of designing a hat with a brim and needed some ideas on that type of brim that you did….I’m doing a hat in moss stitch……I just needed to clarify some of your instructions in the pattern as I don’t know what ‘sm’ means …I’m assuming ‘pm’ means place marker? I get the rest….I’m used to British patterns, as I’m emailing from England….
Does sm mean, slip marker?..just guessing really
Thanks for your help
Kind Regards
Tess
Comment by Tess — November 1, 2008 @ 9:50 am
Tess – sm does mean slip/skip marker
Comment by Kristin — November 9, 2008 @ 9:22 am
I finished the Mikey Cap I was working on. It looks terrific! I lined it at my husband’s request, and I used bias tape for the inner band. If you’d like to see it, you can go to my Ravelry site – beckyzzz
Great job on the pattern!
Comment by Beckyzzz — November 13, 2008 @ 10:53 pm
I love this hat and want to make it for my dad, but I can’t knit, is there any way this can be converted to a crochet pattern?
Comment by AJ — December 21, 2008 @ 5:08 pm
AJ – I can’t convert it to a crochet pattern but I have seen similar hats in crochet. Try http://priscillascrochet.net/free%20patterns/Wearables.pdf or http://www.etsy.com/view_listing.php?listing_id=18001501.
Comment by Kristin — December 22, 2008 @ 10:05 am
[…] working on the ivy cap for Matt, it’s coming along wonderfully . I need to: – pack – yell at the entire financial […]
Pingback by Octosam Lives :: If you’ve bangled one, you’ve bangled ‘em all. :: January :: 2009 — January 12, 2009 @ 5:14 pm
I have gotten all the way to the brim. Do you PU sts. in every st. or 3, then skip one, as you would for a sweater band. also the back piece that comes down adds to the circumference. Do you put the elastic only on the sides after the brim and do you include the back piece. Did you turn your edge under? How did you sew on the elastic?? I think you did a great job of figuring out the design. This is the type of cap my son wears and it will make a great present. Thank you. Louise
Comment by Louise — January 21, 2009 @ 6:20 pm
Louise – For the brim, I believe I picked up every stitch for the 14 stitches, not skipping any. Put the elastic around the whole lower inside of the hat, including the back piece. I didn’t turn the edge under but you could. It’s been a while but I think I machine sewed the elastic on.
Comment by Kristin — January 21, 2009 @ 8:11 pm
What does ssk mean?
Comment by bonnie — November 26, 2009 @ 11:53 am
Bonnie – “ssk” means “slip slip knit” and it’s a form of decrease. Here is a video how to: http://www.youtube.com/watch?v=RGwcYW3GG3M
Comment by Kristin — November 27, 2009 @ 8:06 am
I am stuck on the brim. Please help! Where do you pick up the stitches for the brim. Is it on the ban part or what? Maybe this is truly a senior moment for me Brenda
Comment by Brenda — December 1, 2009 @ 12:32 pm
Hi Kristen,
Thank you for sharing the pattern with us. Lovely hat.
My husband bought one in Japan while on holiday (something similar to yours) and he loves it very much. I m thinking of “why not i knit him one”.
I have saved your pattern, hoping to get the suitable yarn, my worry is that i might not be able to buy the brim here ;(
Anyway, nice hat for someone special..
Comment by jackie — December 8, 2009 @ 10:00 pm
Brenda – For the brim, you need to pick up stitches on the center front of the band (underneath the word “Front” in the diagram).
Jackie – Thank you! You can use any piece of plastic or heavy interfacing for the brim.
Comment by Kristin — December 9, 2009 @ 9:47 pm
Hi – thanks for posting the pattern! I am almost done, but confused on how to and what to insert into the brim to make it stand up. I don’t know what to use for the plastic for the brim (why a snap?), and how to attach it. Any ideas?
Thanks!
Comment by Corina Sahlin — December 20, 2009 @ 9:12 pm
Corina – For the brim, you can use any thin piece of plastic or a few layers of stiff interfacing. The snap is because the front of the hat folds down onto the top of the brim, and the snap holds them together.
Comment by Kristin — December 24, 2009 @ 12:02 am
AJ: You could transfer this, or any pattern, into a crochet pattern if you just use a little algebra( eww, i know). Take the gauge that the knitter puts at the front of their pattern (21 st, 29 rows=4″). Transfer the amount of stitches and rows of the project to inches instead (Use the formula: #stitchesfromgauge/#inchesfromgauge=#stichesfrompattern/X where X will equal the amount of inches you get with that # of CO stitches. Cross multiply and divide the answer to get X. In this pattern: ‘CO 30 st’ is equal to 5.7 inches of fabric, and the height of 29 rows per 4″ is already transferred to inches for you by the pattern maker, example: work until piece measures 3″) . Then crochet a swatch with the hook and yarn that you want to use for the project. Measure how many stitches and rows it takes you to make a 4″ swatch and use algebra again to see how many stitches that would make. (If your crochet swatch was 10 st per 4″ for example, then to get 5.7 inches of the CO that you would get with knitting, you would need to chain 14.25, or round to 14 crochet stitches. Increases and decreases you may have to visualize, or just do the math. I hope this isn’t to confusing. This is proof that you do need algebra outside of high school =).
Comment by Becky — July 22, 2010 @ 10:48 am
Kristin, This is exactly what I have been searching for! Thanks so much for publishing it. Do you happen to remember what the circumference was before you put in the elastic? I want to make it for my hubby and his head measures 25.5. Thanks so much!
Comment by Donna — December 28, 2010 @ 11:49 am
Donna – I’m sorry but I don’t remember. I do think the hat was bigger than the elastic and had to be gathered in a bit.
Comment by Kristin — December 28, 2010 @ 7:52 pm
Knitted this for my nephew…he loved it and so do I… Making another for my husband….
Comment by Babette Witherspoon — March 11, 2011 @ 12:05 pm
Wanted to say thanks! I knit one up for my little boy using your pattern and modifying for his smaller head and my smaller gauge. You can check it out here:
http://knitsburgh.blogspot.com/
Thanks again for posting this one!
Comment by Patricia — March 22, 2011 @ 8:56 pm
When is the switch from # 6 to #7 needle required?
I
Comment by Gloria H. — July 15, 2012 @ 1:08 pm
Use the #7 circular needles for the brim only.
Comment by Kristin — July 16, 2012 @ 11:13 am
on the first increase it says increase one stitch at the end of every knit row ten times but you only start with 30 stiches. this has left me quite perplexed, could you clarify this instruction?
Comment by will — August 8, 2012 @ 10:43 am
Will, you start out with 30 stitches cast on. On each knit row after that, increase 1 stitch on each end of the row (so 2 increases per knit row), until you have 50 total stitches on the needle.
Comment by Kristin — August 9, 2012 @ 12:14 pm
ok. another question. when picking up the stiches for the brim. do you pick up from the bottem on the front bit? because i just finished doing the brim and its seems really tiny.
Comment by will — August 12, 2012 @ 11:53 pm
Yes, you pick up from the front bottom for the brim. Did you switch to the larger needles for it?
Comment by Kristin — August 13, 2012 @ 12:01 am
yes, but it seems very small, i have not stitched the top and sides together yet, but it seems dis-proportioned
Comment by will — August 13, 2012 @ 12:33 am
I found your pattern on ravelry and it was just the one I’d been looking for. I’ve had a bad experience in the past working with 2 strands together, could I use a DK yarn instead of 2 strands of fingering?
Comment by Nikki — September 15, 2012 @ 8:41 pm
Nikki, I’m not sure, you’ll have to check gauge.
Comment by Kristin — September 16, 2012 @ 11:00 am
On the directions for the front/side piece it says to increase 2 on rows 5,7,9. Where in the row does the increase go?
Comment by Nikki — September 28, 2012 @ 6:23 pm
Nikki, increase the stitches at the beginning of the row. And when you reach the end of the piece, make sure you do the decreases on the same side. See the diagram.
Comment by Kristin — October 2, 2012 @ 3:49 pm
Just caught this on a Ravelry search…am going to do a test swatch in linen stitch as I think that might imitate the woven look a little more than the stockingette stitch.
Am looking forward to making it as all in my family have large heads and even the flat caps from the woolen shops in the 7 and 5/8 size are too small. No joking!
Thanks for preventing me from re-inventing the wheel!
Cheers
Comment by Wee Rab — November 19, 2013 @ 5:31 pm
Oh, thank you so much for this wonderful pattern! I’m working at the brim right now and I can’t believe how great the cap already looks. You did really great work with this pattern! I really appreciate you sharing it with us. Lovely greetings from Germany! – J.
Comment by Frau Tee — April 16, 2014 @ 7:14 am